Another Tutorial... Kinda
I guess maybe this is one that I should have put up prior to the videos, but I was so excited about sharing them that everything else went out the window somehow. This "tutorial" is about what I use and how I use it when I create my doodle art. I will also tell you a bit about the why part of my creations. First let's start with my arsenal of pointy objects to draw with. As far as inking your art goes, I like to start with a pencil and then use a pen after. Read on and you'll see why. If you're feeling adventurous or are sure you won't make a mistake then I say go straight for the inking brave warrior!
1) Pencils and Sharpeners: Pencils are good for making your initial doodle that you will use for other purposes or just for you to admire and keep for yourself. I like to start with pencils when I create my doodles because if I make a mistake, I can just go back and erase it, versus starting with a pen or marker and then having to scrap the whole thing or do some major revisions to salvage the doodle. I know some of you may be saying "well if you're really careful, then you can avoid mistakes", and this is true to a point. Some mistakes can't be avoided, like someone bumping into you while you're deeply concentrating on creating your doodle. Pencils can also be used to create some really nice grey and white sketches in addition to having some really nice colored doodles created with color pencils. I like the number 2 pencils.... wait do they make any other pencils besides those? hmmm... Well I guess I like them because they are all that I know in the vast world of pencils. I know that there are higher end pencils that one can purchase for sketching and can probably be used for doodles too, but do you really want to spend that much? Also make sure you have plenty of sharpeners around. I go through a lot of them because the kids usually get to them and forget to return them or misplace them.
2) Pens and Markers: I use pens/markers to trace over my pencils doodles to make them darker after I am satisfied with the end results. I have a few pens that I like to use. One is the Pigma Micron 08 Archival Ink Pen 0.5mm that I purchased at my local art supply store. I paid about $4 for each pen, but they work really well and don't bleed which is a plus. I also use on occasion a Sharpie ultra fine point. They are priced pretty reasonably, but beware! They will bleed through to the other side of your paper. That makes them a plus and a minus all in one. The plus is, that if you're blocking out whole sections of your art and want to do it quickly, then the sharpie's bleeding effect is a plus. Even with the ultra fine point, you can block out a fair amount of your art at a faster rate than coloring with a color pencil or the Micron (for all that you pay for the Micron, it is better to savor it anyways for finer things like line drawing or tracing). When using the sharpie, be sure to cover any surface below your sketch paper with something like a clipboard or a piece of cardboard to prevent the ink from staining the surfaces below or bleeding through to the paper below. The last type of pen I choose to use when inking my art is the Promarx UltraFine 0.5mm Signature Pen which I purchased from Dollar Tree. They came 3 to a pack and work just as well as my Microns. I have actually been using them more than the Microns. I've tried the plain ol' pen method to ink my drawings and just didn't like the results. I haven't tried inking yet with a 0.5mm Pilot Pen yet, but have heard good things about using it. So try different pens and markers and see what you like.
3) Erasers: I have lots of them and not all erasers are created equally. Some are better suited for erasing than others. I am what they call heavy handed. Which basically means that I apply quite a bit of pressure when writing or drawing. When I go back to erase mistakes or to get rid of the pencil markings of a completed drawing, I have noticed that not all erasers work that well at getting rid of those marks. Case in point: I have a nice big eraser that says "Not Again!" which I thought was so cute and, well, the thing is huge, but it sucks at what it's suppose to do, erase. It works to some degree, but I think it is better suited as a novelty eraser than for anything major. I find myself having to go back over my inked doodles with one of my smaller erasers to get a more polished look. My huge eraser may work better for someone who writes very very lightly. The lesson I have learned from this is to just go and get an art eraser from the start to avoid the unnecessary wrist/hand fatigue from having to go over your drawing so many times. Of course you don't want to be sloppy either, so get rid of as much evidence of the pencil as you can.
4) Sketch Book and Notebooks: These you can get pretty much anywhere. You'd be surprised what you can find for art at the dollar store. I use the notebook for practice and for those days when I am just creating random doodles that don't necessarily belong anywhere and are usually drawn one on top of the other with mistakes intact. The sketch books or sketch pads don't come with many sheets of paper in them, so I don't use it until I am absolutely sure of what I want to create. Sometimes I may start off with the idea or feeling to create one thing and it grows into something completely different and I love those moments when they come, so I save my best paper just for that. I do plan to one day purchase some nice big sheets of construction paper and have a doodle drawing extravaganza!
5) Optional Items: A compass, ruler, and protractor. I put them under optional because they aren't really necessary for creating doodles, but they do help if you have them. If you don't it's no big deal. I use the compass to make really round circles sometimes when I make mandalas, but u can use a nice glass or bowl or any other perfectly round object to create the same results. I like the ruler to create straight lines, but again you can use something from around the house like a hard cover book, a sturdy piece of cardboard, or any other straight edge item. I mostly use the protractor for it's ruler end and very seldom do I use the other portion of it because I don't draw angles often. The choice to have these items are completely up to you, I just want you to have some fun and unleash your creative spirit.
Now, the reason I start my drawings in pencils and then move over to pen other than the fact that pencils allow me to erase any mistakes, is because I like to scan them into Gimp where I generally do my coloring of them, when I feel like color. This method makes the process of preparing my drawing in Gimp for coloring so much easier. I have scanned images in both pencil and in ink, and the ink seems more defined in my opinion. So there you have it, my kinda a tutorial, but not really tut. Now everyone back to the drawing board!!
|
|
|
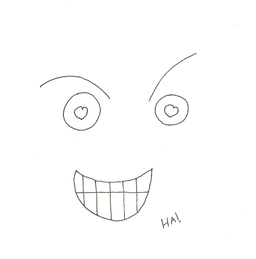
This image is pencil only. He doesn't look too exciting to me. This image could be made darker using some tricks in gimp, but not everyone uses Gimp, Photoshop, etc. to share their work and you may not either. So to get the best results, ink it!
|
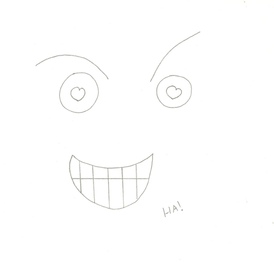
This is the same image after inking with my handy dandy Promarx Signature Pen and erasing away the pencil marks. You can better make out the maniacal heart shaped pupils and the nice little "HA!" written on the bottom. If you plan on putting your images up on the web then, again I recommend inking to get the best look.
|
|
|
How To Draw A Teddy Bear (Easy)
Besides drawing flowers, I like to draw other cute doodles, such as teddy bears and pigs. They seem to have a life of their own and makes me wonder sometimes what's behind those shiny little eyes. The Velveteen Rabbit although not a teddy bear, remains one of my favorite stories about a beloved stuffed animal and it also became a favorite for my son too. Drawing these stuffed animals can sometimes seem difficult, but rest assure because I have made it easy. Many times when I draw or should I say what helps me finally "get it" is to think of the parts that I am drawing differently. For example: in the "How To Draw A Teddy Bear (Easy)" video, I tell you how when drawing the head "I see a frown (top part) and a smile (bottom part) connected by a "C" on the sides". Doing it that way made it much easier for me to create Teddy's head. This trick may also work for you if you're having trouble. Don't stress yourself out though because doodling is suppose to be fun and when it doesn't feel fun, then leave it alone and save it for another day. I did not do a written tutorial for this project because I thought it would be easier to learn visually. Enjoy and thanks for viewing.
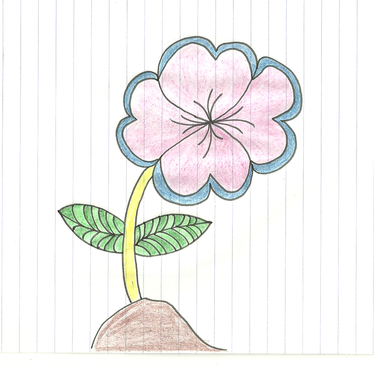
How To draw a super cute easy flower
This video tutorial teaches you an easy way to draw a doodle art flower using a heart shape. flowers are fun to draw and color, and can be drawn with or without a stem and leaves and still make a bold statement. Be sure to keep the annotations on while watching the video because they have the instructions/tips on how to make this cute "pansy" like flower. It is a great video to share with kids and others who like to doodle, but aren't sure where to start. There are numerous ways to draw flowers and other flower shapes, so have some fun and experiment. I will make another short and simple tutorial on another version of the flower so stay tuned and thanks for watching.
|
